 |
The schoolpipe making project (updated 01/06/10) |
Description of the technical side of the school pipes project
Specification
I have worked as an engineering Designer for 45 years mainly designing machinery for the manufacture of products and the products themselves. For the last 30 years I worked for a major design consultancy and was often involved in the brainstorming to create new products or add innovative ideas to existing products
At the end of 1997 I spend an interesting evening discussing the making of smallpipes with Alistair Anderson. We kicked around a lot of ideas on how the cost of pipes could be reduced and the reliability improved. When I returned to work I had a little spare time and decided to look at the design of the smallpipes from the perspective of a design consultancy and one of the first steps is to identify exactly what the product should do. This is done by preparing a requirement specification some times known as a product design specification.
To view a copy of the specification click here. This is really a discussion document to start the process of developing a complete product design specification.
I was asked by Folkworks to start looking into the design based on the discussion document so off I went!
The Design Process
My initial approach to the design was to break the subassemblies down into simple elements and get rid of anything that didn't need to be there. I then made some simple prototype parts to prove the viability of the ideas and to remove early any ideas that didn't work well enough. It is really important to be ruthless at this stage. I also kept a log book so that anything that was useful and any passing thoughts could be captured.
The Drones
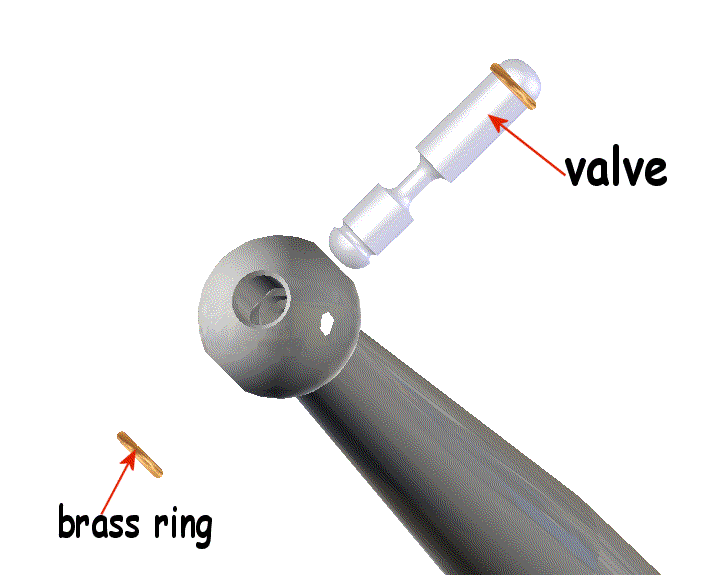
I decided that the drones needed should be the low D, the low G hand the high d. The reasoning behind this choice was driven by the expectation that a keyed chanter would be provided. This set would allow the normal G/d drone harmony in the key of G and a D/d harmony in the key of D. Later in the design process I found a really easy and cheap way to provide a bead on the G drone so that a D/A/d harmony would be possible in the key of D.
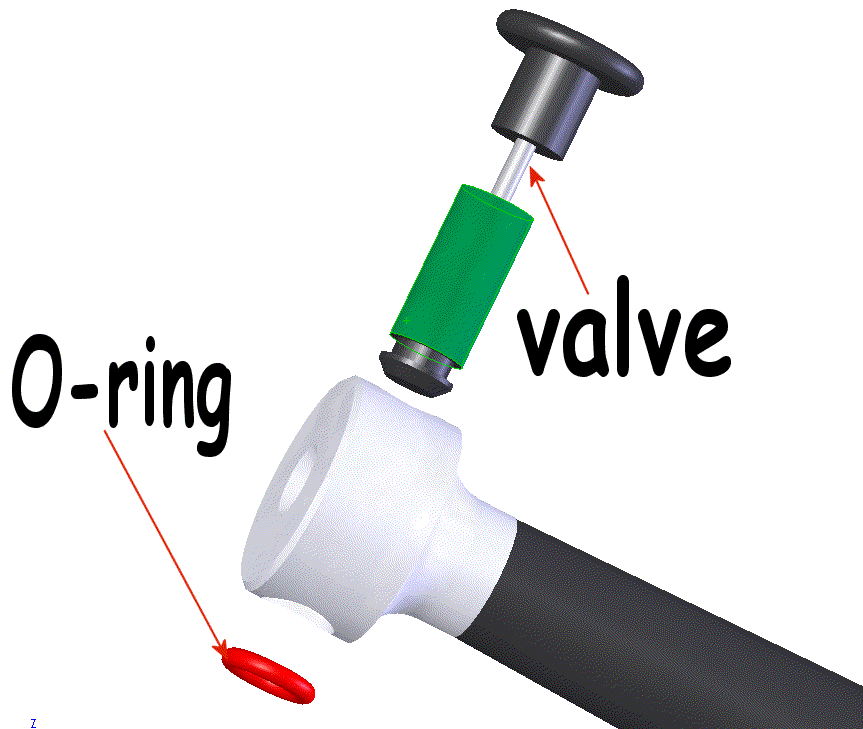
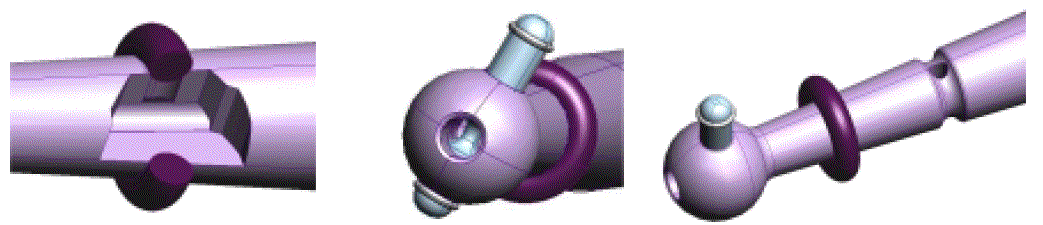
To simplify the manufacture I separated the standing part into 2 separate items. The main body and the top part that carries the seal and slides into the sliding part. Separating these parts had a number of benefits:-
- Less wasted material during manufacture
- The bore could be drilled with simple drills (no deep hole drilling)
- The thin part could be easily replaced if broken
Once the decision had been made to separate the standing part it was easy to see that threading the part so that they could be screwed together made good sense. I also decided to screw the standing part into the drone stock.
The sliding part can be very simple and if it wasn't for the need for a valve at the end it could be a single part. I was keen to achieve a "through hole" design for the valve as this gives a better sound to the drone. I looked at a number of different designs for the valve starting with the simple rotary valve shown in the discussion document. This looked too fragile once designed so I designed a slide valve and that was used on the prototype. The design worked well enough for the prototype but I decided to beef it up and reduce the manufacturing cost when I produced the final design. I also decided to make the end cap a separate assembly as this could be a single design for all the drones and also could be in white acetal to give a more traditional look to the set.
 |
 |
 |
| The prototype drone valve design |
The production drone valve design.
click on picture to download a short movie of it in action. |
Section of the production drone valve design. |
The final valve works very well and it gives a really clean tone often better than the traditional piston valve and the same as the tone achieved by a removable stopper. This is because the cross sectional area at the centre of the valve is greater than the cross sectional area of the sliding part bore and so has no effect on the tone. The end result is a bit bigger than a traditional cap and valve assy but this design was driven by functionality not beauty.
Adding a tuning bead to the sliding part
After discussions with Kathryn Tickell I looked into adding an "A" tuning bead to the G drone. The design I came up with is as shown below. The actual tuning bead is a 9mm bore x 4mm section, rubber O-ring (a standard component). The O-ring sits in a groove when it is sealing the "A" hole and is rolled out of the slot when the "A" note is needed. The O-ring remains captive on the drone when not in its groove.
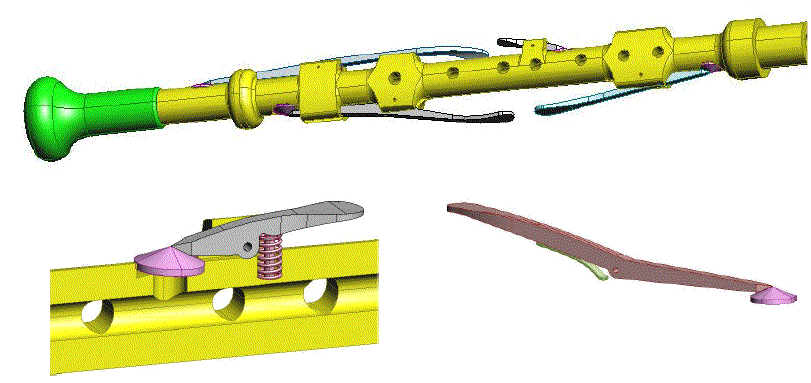
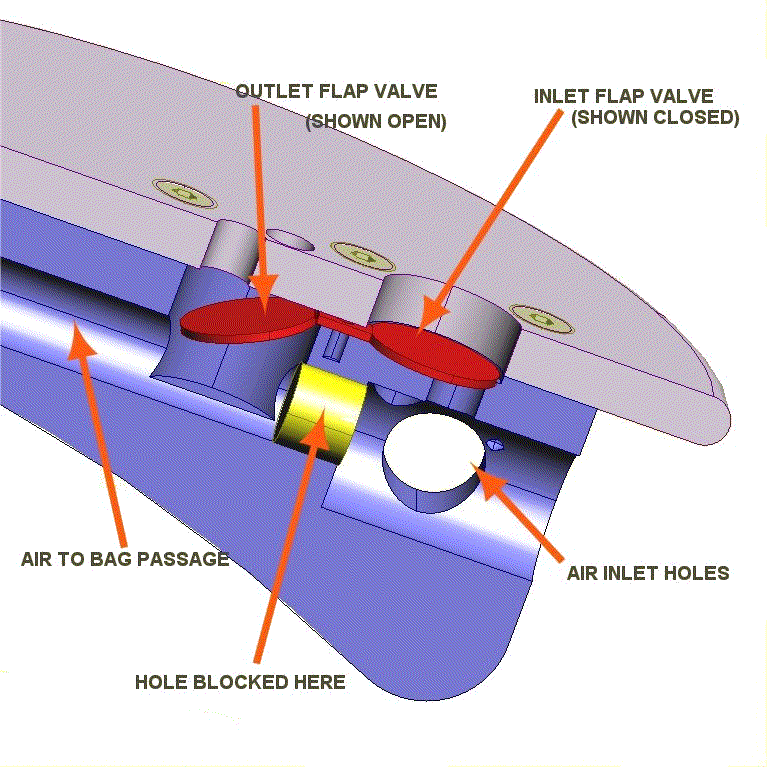
Because the initial production was to use only an unkeyed chanter the first drones didn't have this implemented.
Drone stock design
The drone stock is very similar in design to the common smallpipe stock. The differences being:-
- The stock is clamped to the bag rather than tied.
- The drone standing part is screwed into the stock.
- The drone reed is clamped to the stock by the screwed in standing part.
- The drones are operating in a chamber fed by a single hole.
- The drone stock is undecorated.
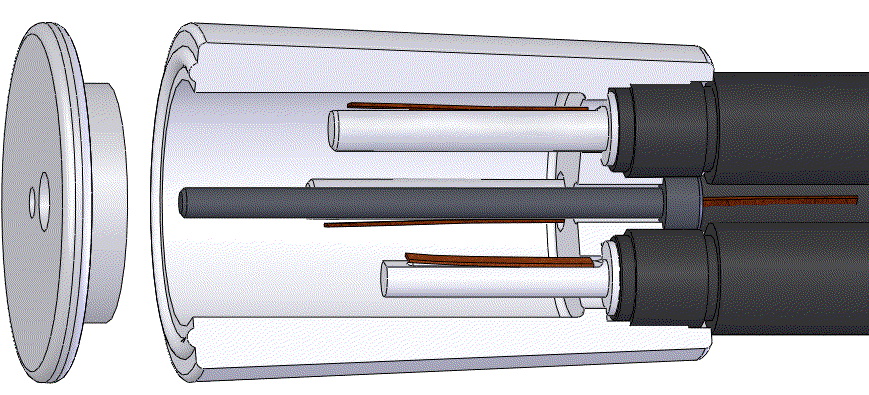
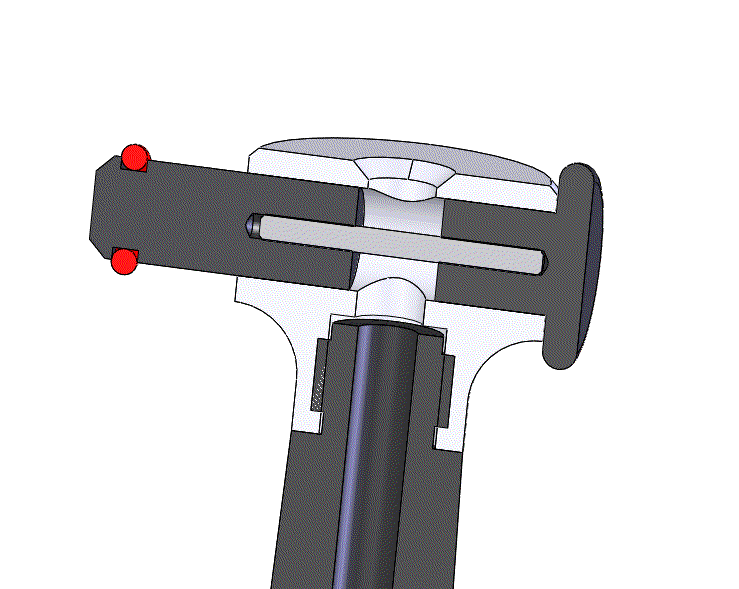
In practice the only element I would change was the lip feature to clamp the bag. I think that this could be deeper and sharper to give a better grip. Having the drones in a chamber didn't have any effect on the tone and it did add another level of protection to the drone reeds. Clamping the reeds is a good idea as I have found that with traditional sets that if the reed is the least bit loose it becomes unreliable.
Drone reed design
I tried a number of different drone reed designs. I was looking for a reed design that achieved the following criteria:-
- Cheap to make
- Easy to set up
- Made from easy to source materials
- Reliable
- Able to be clamped in place
I decided early on that the traditional cane reed was too tricky to make and keep working so I tried a number of different ideas:-

In the picture above are a number of the designs I tried. The ones made from square section brass tube were very successful. The opening was milled and the end of the tube blanked off with a square of balsa held in with super glue. The top hat bush was glued on and the gap between the round and the square filled with the glue. I tried a number of different ways to hold the tongue to the body and probably the best from a production point of view was a narrow (1/4") strip of sticky tape. I used a tape made by Scotch called "magic tape" that is used for mending torn drawings etc. and has a much better and more permanent glue than Sellotape. I also found that a small O ring was a good bridle and easy to move about.
I started by making the tongues from the same material that we use for chanter reeds but the preparation of it is a bit tedious and hard to replicate with any accuracy so I tried a thin (1/64") plywood that I use for aeromodeling and I was pleasantly surprised to find that it was every bit the equal tonally to the reed cane tongues and so much cheaper and easier to use.
One of the influences was the new modern designs of Highland pipe reeds. These are extremely reliable and easy to set up but much too big for the smallpipes so I looked to see if there was any of the features that could be used on smallpipe reeds.

The Highland pipe drone reed shown above has a number of interesting features. The tongue is a carbon fibre item clamped with the grubscrew at the left side. The bridle is a cast metal item and is released and moved with the grubscrew second from left. At the right hand side is a rubber plunger that is used to adjust the internal volume of the reed. It wasn't clear at first what this did but I have found out that reducing the volume of the internal chamber raises the pitch of the reed and increasing it lowers the pitch. Unseen at the back of the body are 3 grubscrews that allow adjustment of the curve of the body thus adjusting the opening between the tongue and the face. This allows the reed to be set to play at the correct pressure. Click on the picture for an excellent set of composite highland pipe reed pictures
For the smallpipes most of the ideas require too much space to be adaptable to the smallpipe drone reed but I did plan to try some of them.
This reed body is machined from acetal and the intention was to tap a M3 thread in the end and use a nylon M3 screw to adjust the internal volume. I also planned to try a moulded carbon fibre tongue and I intended to mould the slight curve into the tongue. As this effort was likely to take longer than I had available(I was still working full time) it remains on the back burner.
Chanter reed design
I decided quite early on in the process that the chanter reed would have to be made to the same design and from the same materials as the traditional pipe reed. I was often given advice in the early stages that I would have to develop reed made from yogurt pot plastic but, as no one had demonstrated that this was possible, I chose to ignore this advice and tread the traditional path. I did however want to avoid the necessity for the teacher to adjust any reeds in class and to that end I wanted to make the reeds to a standard design and preset them so that in the event of a reed breakage it should just be a case of plugging in a spare reed and the set would play again at the correct pitch and pressure.
I did look a the possibility of using Highland practice chanter reeds as these are very cheap (about £4) but I couldn't get a reasonable tone or tuning from the ones I tried.
- The reed should play at a pressure of 14"WG
- The reed should have a similar tone to the normal F set i.e. not too loud or too shrill
- The reed when set to the correct position should be completely in tune
I didn't do very much development of the reed in the end as the reeding and setting up was to be done in Northumberland far from my workshop so I couldn't influence the reed making. From the little testing I did it was clear to me that a blade width of 10mm produced a reed that wasn't too loud and had a good tone. The results of one series of test are available below:-
results of working on a number of reeds
The keyed chanter
Whilst designing the School Pipes I did some experimenting with a much simpler and more robust type of springing. I worked out how to fit a coil spring close to the pivot and by putting the dimensional data and the spring rate for a number of different springs into a spreadsheet I was able to optimise the design to get a much nicer feel to the key movement. I made a prototype 5 key set and tested the concept. I have seen a number of springing methods used and it seems that whenever a coil spring is mentioned it is dismissed as "tried that and it was hopeless" but whenever I delve further it seems that the spring was put under the touch end of the key where it is bound to fail. I will probably do some further experiments to see if this concept can be easily applied to the normal smallpipes without compromising the functionality, looks or feel.
Here is a pdf file with the results of the measurement of spring forces on tradition chanters and the spread sheet used to calculate the forces when a coil spring is used.
Collected and calculated data

Although we didn't do a production run of keyed chanters I did do a lot of preparation and design to see if keys could be made at a sensible price. My best price for the manufacture of keys was about £10/key in quantities of 200 sets of 5 keys. This increased to £15 if the quantities reduced to 100 sets.
The process that looked most suitable was investment casting and this would give a reasonable accurate key needing only the pivot hole drilling. The price was for keys cast in aluminium and moving to brass would increase the costs by about 50%. So the keys alone would require an investment of around £10k and that is a 1999 price and would be almost double now.
I had reservations about the use of aluminium as in the cast state it can be quite soft and the area of the spring would have a lot of wear.
The main reason that we didn't go ahead with the production was the the up-front cost and the risk involved.
The chanter stock
I was keen to improve the design of the chanter stock as I have found that the traditional design where the neck of the bag is folded down has a few limitations. My aim was to achieve the following things:-
- No folding of the bag neck
- Easy removal of the chanter
- Protection of the chanter reed when the chanter is removed
- Isolation of the chanter from bag resonances
I designed 2 different stock assemblies both of which I had a lot of faith in. The first one I did prototype and found it very easy to use. Below are pictures of the 2 designs:-
 |
 |
| The first stock design (my Favourite) |
The second stock design. |
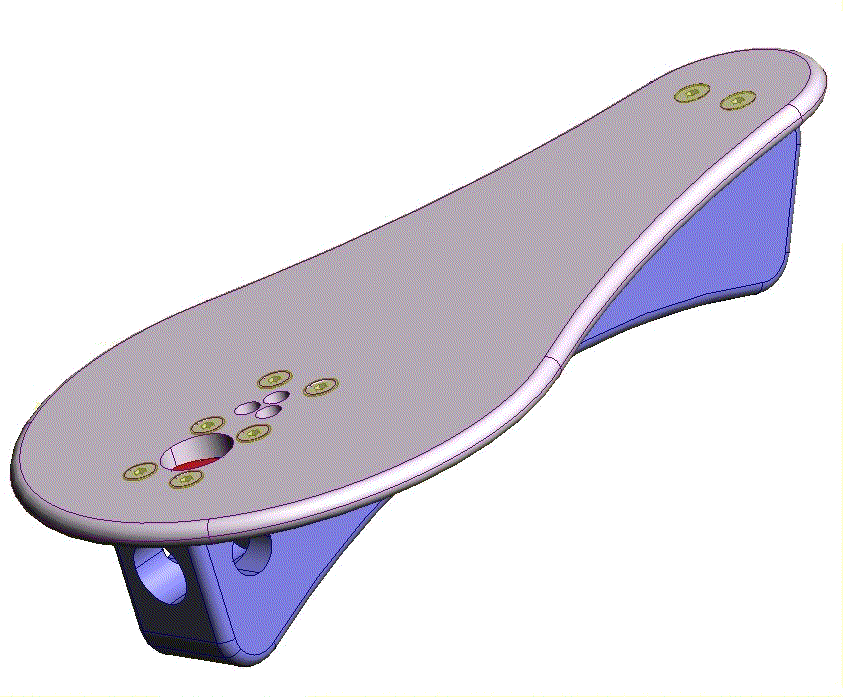
Here are some pictures of the prototype from a memo:-
Stock prototype pictures.
The Bag
- The bags for the schoolpipes were purchased from Ross Pipes in Australia. The bags were made from a Gortex type material originally used for the Highland pipes. They cost about £8 each (in quantities of 200)
I see that Ross Bagpipes now make their bags in a suede material and even fit an airtight zip to the bag (very useful for removing reeds that have dropped in!)
The Bellows
The bellows proved to be very hard to sort out. Off the shelf bellows were priced from £80 from one part time maker up to £350 from a professional maker.
I did try to come up with a design that would do the job and achieve the following requirements
- Fool-proof in use
- Cheap enough for the target price
- Assemblable without special skills like leather sewing
- No sealing goo required
- Made from durable and washable materials
One way that I hoped would provide an answer to the requirements was to gather together all the things that the bellows, blowpipe and bag non-return valve did into a single assembly. I do believe that I came up with a reasonable design that would do the job in a cost effective way. The design was built on a spine like the French Musette bellows.
 |
 |
| Shown transferring the air to the bag. The front valve is open and the rear valve is closed. The air has 3 holes in the spine to enter the bellows so it shouldn't be possible to block it accidentally |
The prototype bellows design shown drawing air into the bellows
The front flap valve is performing the job of the inlet valve on a traditional
blowpipe and is closed holding the air in the bag |
 |
Top view of the bellows assembly. Only the bottom plate is shown and the leatherwork is still not designed. |
The most complex part is the spine I wanted it made from acetal and I did get some attractive prices for it.
£23.5 for 100 off and £19.5 for 200 off
even if the remaining parts were £30 the total cost of the bellows assy would be significantly less than the cost of the cheapest bought bellows and I believe that it would work better.
© Mike Nelson. All rights reserved.
This information has been put together by Mike Nelson for his own amusement :)
Go back to Mike Nelsons Home Page
This site is created and maintained by Mike Nelson for his own pleasure
© 2010 Mike Nelson