The construction of a chanter reed can be divided into three distinct tasks, first the preparation of the cane, second the assembly of the parts and third the scraping of the blades to produce a sound. It is important to note that, when starting out on the making journey, only about one in ten reeds will be good and out of that ten another three or four will be usable, so I recommend starting off by preparing ten or fifteen slips of cane.
 The cane used should be good quality Arundo donax from Spain approx. 25mm (1") diameter free from surface defects although some brown discolouration of the surface is quite normal and will not affect the finished reed.
The cane is sawn to a length of 90mm (3 1/2") and split into strips not less than 12mm (1/2") wide using a kitchen knife. It should be possible to get five strips from each section. Mark round the top of the cane with a pencil, place the cane on a solid surface, put the knife over one of the pencil marks and tap firmly with a hammer as shown. This will force the knife 6mm into the cane and the split can be continued along the grain using hand pressure only.
 NOTE the cane must be split not cut.
If the cane is thick walled it can be split crossways as shown and the waste used to make cane tongues for metal bodied drone reeds.
Tools needed for the gouging are :-
1) A gouging block to support the strip
 This is made as shown in the drawing, the groove should be the same curve as the outside of the cane, the end stop is a piece of 6mm ply tightly fitted to a groove, it should not be glued as it will need replacing after a time the distance along the groove to the stop should be long enough to avoid the cane strip overhanging. The block under the front is clamped in a vice but if a vice is not available I would recommend that this is replaced by a piece of 6mm ply glued and nailed to the front face this will act as a hook enabling gouging to be safely done on a table.
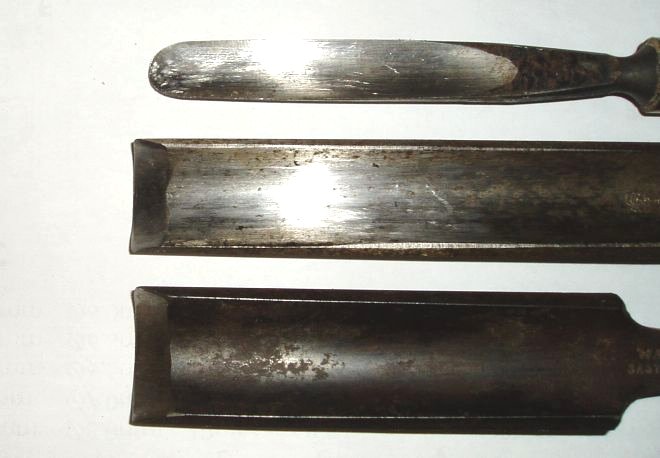
2) A gouge
This should be a 3/4" gouge with a curve of about 1/2" or 12mm radius sharpened on the inside as shown in the bottom 2 gouges in this picture.
Note
- This sharpening is called "inconnel".
- It is important that the gouge is very sharp.
3) A thickness measuring tool.
I use a violin makers thickness gauge mainly because I have one it is however rather an over kill and a simple pair of calipers will do equally well and when a number of reeds have been made you will be able to judge by eye with sufficient accuracy.
4) cane sanding rod.
I use a chanter blank, this is usually 7/8" diameter and, with a piece of 600 grit emery paper wrapped around it, will be just right for smoothing the inside of a cane slip.
Preparing the cane slip
The cane strip is placed on the gouging block up to the end stop and a cut is taken with the gouge starting from a point about 5mm from the end furthest from the stop. The gouge is pushed through the cane, towards the stop, removing a shaving about 1/2mm thick. Take care to ensure that the gouge is kept as flat as possible and the cane is removed evenly.
 The strip should now be reversed end for end and the process repeated. Continue this sequence inspecting frequently until the cane slip is an even 0.8mm thick and as smooth as possible (lumps and hollows will cause grief later). Care must be taken to ensure that the sides of the slip don't get too thin as this can cause the reed to be leaky. It can take some practice to get control of the gouge and produce good cane slips I started out by practicing on some bamboo of similar size obtained from a carpet warehouse (some carpet is delivered on a roll with a length of bamboo through the middle) when the gouging is going well it is a good idea to do a good batch of slips. If the inside of the slip is not smooth it can be rubbed on the sanding rod as described above.
A final refinement is to lightly scrape the outside of the cane to remove the shiny surface this may give the binding a better surface to grip and can also make the reed less prone to cracking when it is bound to the staple.
 The slip can now be reduced to the correct width of 11mm. If I am only making a few I do this free hand by holding the slip in my left hand and planing carefully using a small hand plane checking frequently with a ruler, but, if a quantity are being produced, I use a woodworkers shooting board with a side stop fitted such that as the cane reaches the correct width the plane stops cutting.
The ends of the slip must be tapered to a point for 12mm each end as shown, mark out the first slip and cut as accurately as possible using a sharp knife or scalpel then use a sharp pencil to mark out the rest of the slips using the first as a template. The points should be as symmetrical as possible as this will help to line up the slip when fitting to the staple.
Folding the cane
 The slip is now ready for folding. Mark the centre of the slip and, holding the slip on a 3/4" diameter dowel, and using a scalpel, cut across at right angles to just less than half way through, I like to moisten the slip in the area to be folded as this can help the slip to fold cleanly. If the cutting has been done accurately the two blades will match up exactly with the lips of the reed (the line of the fold) pressed together in a straight line.
The blades should now be wrapped with about ten turns of strong cotton ready to fit to the staple. If you have trouble achieving a good fold the blades can be separated by filing a groove across the centre and then rolling a sharp knife around the groove with the slip held on the dowel. The two pieces are then held together with strong cotton as before.
The staple
 The staple is made from 3/16" outside diameter by 1/64" wall brass tube cut to a length of 7/8" (22mm) the brass is annealed to soften it by heating to red hot and allowing to cool.
The oval eye is formed using a 6" oval nail. The end of the nail is filed to a taper for about 1" taking care to preserve the oval section. This is pushed or hammered into the end of the tube to form the eye as shown the staple is finished by using a pair of flat-nosed pliers to extend and even up the taper until the staple is tapered for half its length. Take care however not to distort the oval eye.
Some makers prefer to make the staple out of thinner material usually 0.25mm (.010") brass shim this is cut to 15mm wide by 22mm long strips formed into a tube by bending round a 4mm diameter mandrel with the fingers and then rolling with a medium 10" file on a hardwood block as shown.
The eye is then formed using pliers this method is claimed to make a better reed but I would recommend beginners to start off with the first method and try the shim method only after successful reeds have been made using tube staples.
Assembling the reed
The staple is glued into the blades with the eye approximately 1.5mm (1/16") below the shoulder as shown. Take care to set the staple straight with the blades, as an asymmetric reed may touch the sides of the stocks.
There are a number of glues that can be used to glue the staple to the blades. For small batches of reeds "Araldite" works very well, although it is rather slow. A faster method is to use a "hot melt" glue. Many of the old makers used a lump of shellac and there are a number of modern hot melt glues commercially available which will work just as well. The method I use is to hold the staple with a pair of round nose pliers and heat the top (the bit that the blades will be stuck to) in a gas flame. The hot staple is held against the shellac and rotated until the top half of the staple is coated with molten glue. Then, the staple is quickly inserted into the blades and positioned before the glue cools down and hardens. After the staple is cool the joint should be checked.
If the staple is not in the correct position the glue can be reheated by heating the tip of the staple in the gas flame taking care not to scorch the cane. This will melt the glue enough to adjust the position of the staple. It will help the wrapping if the cotton used to hold the blades together is pulled close to the shoulder of the reed in order to hold the reed sides closed until the glue is hard.
The blades can now be beveled around the edges of the tapered section removing the sharp corner where the reed is wrapped. The points should also be blended into the staple to give a neater look to the finished reed.
Wrapping the reed
When wrapping the reed it will be easier to hold if mandrel is fitted to a file handle. The mandrel should be the same diameter as the bore of the staple and filed to an oval section at the end to fit securely into the staple without allowing it to rotate. The thread I use for wrapping the reed is "stranded embroidery cotton". This can be obtained in a range of colours but I have found that red reeds in general seem to work best.
Reeds can look very pretty if random dyed colours are used.
The thread is coated with a sticky wax coating by pulling it across a block of wax.
I make a block of wax by melting equal parts of bee's wax and fiddle bow rosin (colophony resin) in an old saucepan over a gentle flame, when both the wax and the rosin have melted together a block can be cast by pouring the mixture into a short piece of tube and allowing to cool, remove the wax by heating the tube gently until the wax slides out. The thread should be pulled across the block until the thread is stiff with wax.
The thread is laid over the staple as shown and the first turn taken over the loose end. The thread should be pulled as tightly as possible to lock the first turn continue wrapping the thread round the staple, keeping the thread as tight as possible until two turns over the point of the blades. Continue wrapping round the taper of the blades but don't pull the thread quite so tight until the corner of the taper is reached. If the tension of the thread has been correct the sides of the reed will be either just touching, or, if there is a gap, it will be very small.
 The thread should be wrapped for two more turns pulling tightly to fully close the sides finishing of with a half hitch pulled as tight as possible. Cut of the loose ends of thread flush with the wrapping.
The wrapping should now be consolidated by rubbing firmly with a piece of smooth round steel.
This flattens the thread and closes any gaps. The final sealing is done by rubbing a thin coat of white woodworkers glue (preferably an "Aliphatic resin glue such as "Bordon") over the wrapping, allow to dry, and give a final coat of cellulose lacquer (model aircraft dope).
The bridle is made from two turns of 22s.w.g. tinned copper wire. This can be obtained from a specialist electronics shop or your local TV repairman.
A 600mm (2ft) length of wire is taken and with one end anchored by gripping in a vice, and the other end held in the right hand, the wire is pulled tight and the reed, held in the left hand, placed on top of it with the wire close to the top of the wrapping. The free end of the wire is taken over the top of the reed, taking care to keep it tight and close to the wrapping. This completes one turn. Repeat by taking the wire over the top again keeping close to the previous turn. The bridle is the locked by twisting the two ends together tightly and clipping off short.
Thinning the blades
To thin the blades I use a tool made by fixing a piece of 180 grit emery paper to a 12mm wide 3mm thick piece of wood 150mm long. The emery paper can be fixed using double sided Sellotape. The reed is held in the left hand, gripped by the staple, between the ball of the thumb and the side of the middle joint of the second finger. This leaves the index finger free to support the back of the blades, whilst the emery board is used to carefully remove material from the top surface of the upper blade. The reed should be turned often, ensuring that material is removed equally from both blades. The reed should be held up to a strong light (100watt) and the thickness of the blades judged by the amount of light visible through the blades. This will show up any thick areas and these should be reduced until the blade is even all over. Take care not to over thin the sides especially near to the tip as it is fatally easy to thin a blade right through in this area. When the blades are quite thin they can be separated at the tip by cutting across with a sharp straight bladed knife. hold the blades down onto a flat piece of hard wood , place the knife on the blades where the cut is required and press through the cane. Great care must be taken to cut cleanly through the blades by pressing down and not to pull the knife across the blades as this will easily split the cane.
Note.
Some makers use a pair of end nippers to clip the ends of reeds. This works well providing the nippers are sharp.
It should be possible to produce a sound from the reed by sucking through the staple. Failure to produce as sound at this stage is usually caused by either the blades being too thick or too open at the tip. If the former, continue with the sanding until a sound is obtained, but if the latter, the lips can be closed by squeezing the bridle (the lip opening should be about 1mm at the centre).
Once the reed starts to sound, thinning can continue. At this stage I usually change to a piece of 240 grit put face up on a flat surface. The reed is held in the right hand, gripped between thumb and second finger the reed is rubbed on the emery paper, applying pressure with the index finger.
At this stage the reed should have a good "crow". This is a sound which is hard to describe but I listen for a harsh edgy sound with plenty of upper harmonics. When a number of reeds have been produced it will become easier to tell the good reeds from the poor at the "sucking" stage. As well as a good "crow" the reed should have a "strong" easy to produce sound. Care must be taken to put only the end of the staple in the mouth and not to allow the blades to become damp, as this can damage them.
The note produced by the reed should be about C natural this will give a chanter pitched at close to "concert" F. The older sets of pipes were generally pitched midway between F natural and F# and it is true that it is easier to attain a good bright tone at the higher pitch. I believe however that it is important that a standard is established so that pipers can play together and "concert" pitch (A= 440Hz) is a standard available all round the world. I have found that with careful selection of the reed an acceptably bright tone can be achieved at "concert" F
The reed should be checked for leaks by placing the tip of the index finger over the tip of the reed and sucking through the staple. If a leak is detected it is probably down the sides of the blades and can be sealed using "resin w" or similar woodworking glue. If the leak is in the wrapping a second coat of lacquer should cure it.
Reed Setting
This is the adjustment of a reed to get the best tone and tuning from a chanter, when played at the correct pressure. The following is a list of actions and their effect as a guide for fine tuning the reed to suit the chanter.
Thinning the blades
Lowers the pitch
Lowers the pressure
Shortening the blades
Raises the pitch
Raises the pressure
Closing the lips
Raises the pitch
Lowers the pressure
Opening the lips
Lowers the pitch
Raises the pressure
From this list, it can be seen that the choice of action is fairly obvious :- A sharp reed playing at too high a pressure should be thinned and/or closed at the lips until the correct pressure/pitch combination is achieved. A flat reed playing at too high a pressure should be closed at the lips and shortened until correct.
As a general guide I have found that a blade length of 22 or 23mm and a lip opening of 1mm is about correct for a standard pitch chanter.
Some makers prefer to cut a tapered reed socket claiming a smoother entry into the bore of the chanter but I haven't found any difference and I do find a parallel socket helps to make finding the correct position for the reed easier.
The reed is wrapped with waxed hemp thread, around the staple end, until it is a firm fit into the chanter socket, although not so tight that it cannot be moved when required. I bore the end of the chanter 6.5mm diameter by 15mm deep, thus enabling a reed wrapped with waxed hemp, to be slid in and out to tune the chanter.
The reed should be set in the chanter so that the tip is 53mm from the shoulder of the chanter. This is a good starting position and the position will not differ by more than a couple of mm if the chanter has been made to the drawings.
Try the chanter and adjust the reed position till the lowest notes of the chanter are as close to the desired pitch as possible and the top notes are approximately 15 cents (1 cent = 1/100th of a semitone) flat. I like to undercut the top notes as this seems to improve the tone and by leaving the top notes flat this will happen automatically when the chanter is tuned.
I like to clip off the corners of the reed tip, this helps stop the corners catching on the side of the stock and starting a split it also makes the reed slightly easier to play and slightly lower in pitch.
If the lower notes have a poor tone thinning the reed close to the bridle may improve them. However, care must be taken not to over thin as this can cause false notes.
Squeaky notes
If the chanter is "squeaky", that is, the notes, particularly the lower notes, give a high pitched squeak instead of a pure note. There are a number of possible causes :-
Firstly and most usual is a squeaky reed. This is often caused by cutting the blades too short. It can happen to a reed that is otherwise excellent and can often be improved by thinning the blades close to the bridle. Another cause is a leak either from a pad or from the sides of the reed. Very occasionally it may be caused by the bore length being wrong and a piece of cotton wool in the end should cure the problem.
Back to Introduction page
Back to Index page
© Mike Nelson. All rights reserved.
This manual has been put together by Mike Nelson for his own amusement :)
Go back to Mike Nelsons Home Page
This site is created and maintained by Mike Nelson for his own pleasure
© 1997 Mike Nelson
